Eight frames in which snow becomes a luminous environment, small colours acquire narrative force, and pale skin, dark rooms, red-green interiors and underwater cyan each demand a different separation strategy.
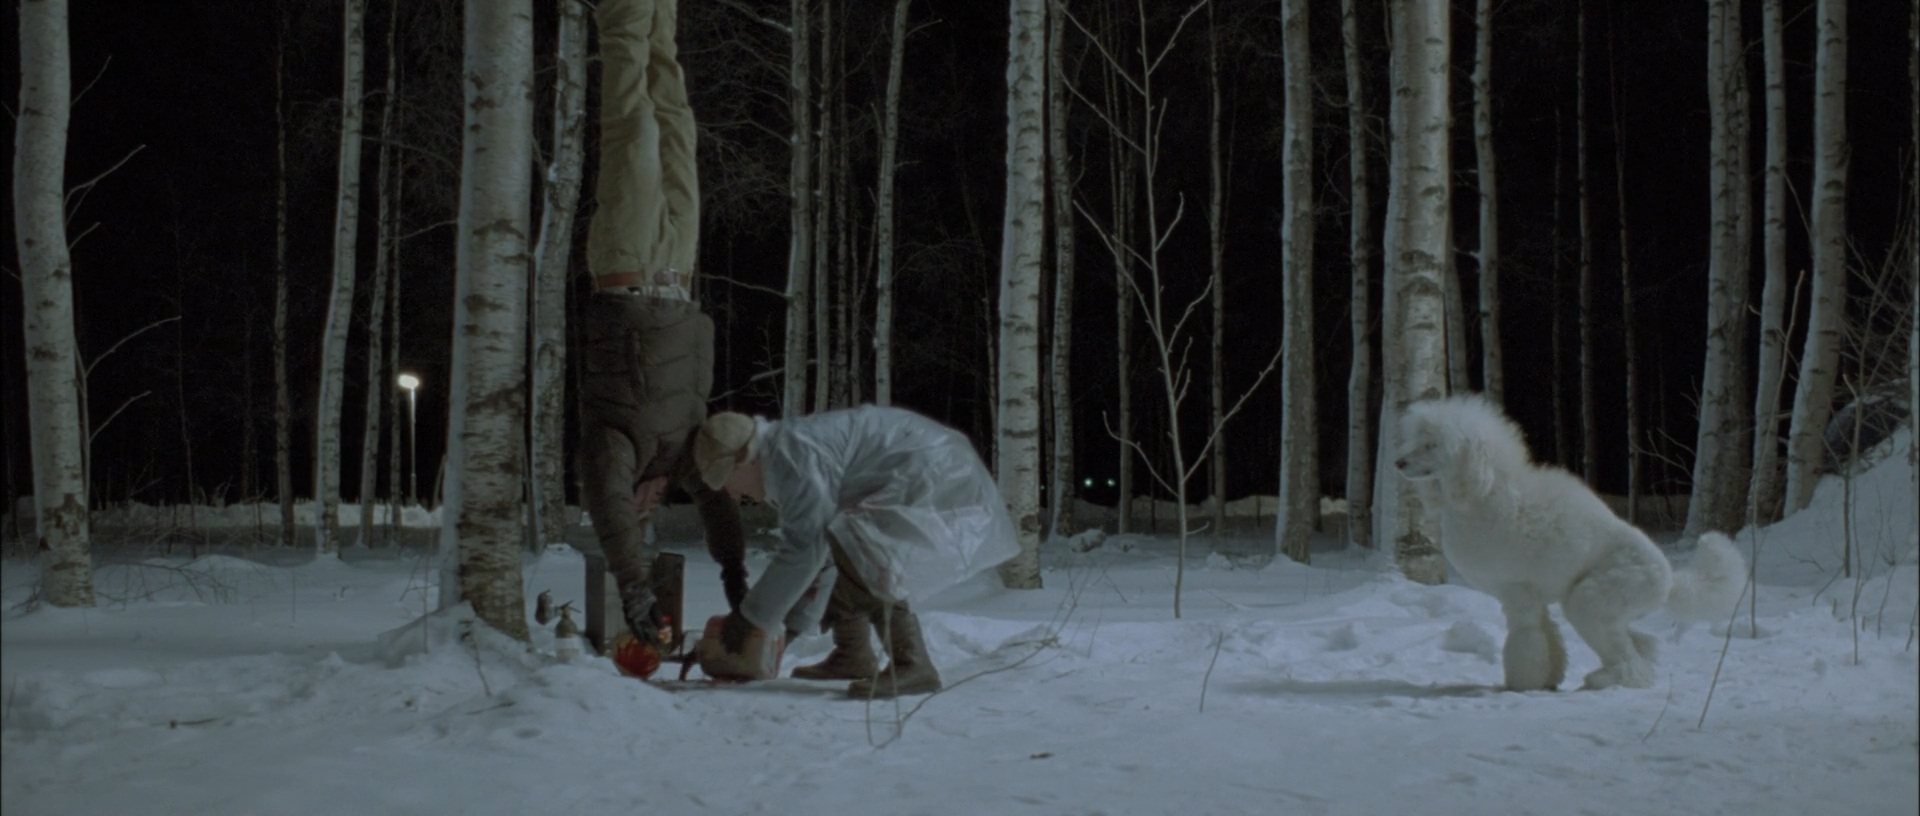
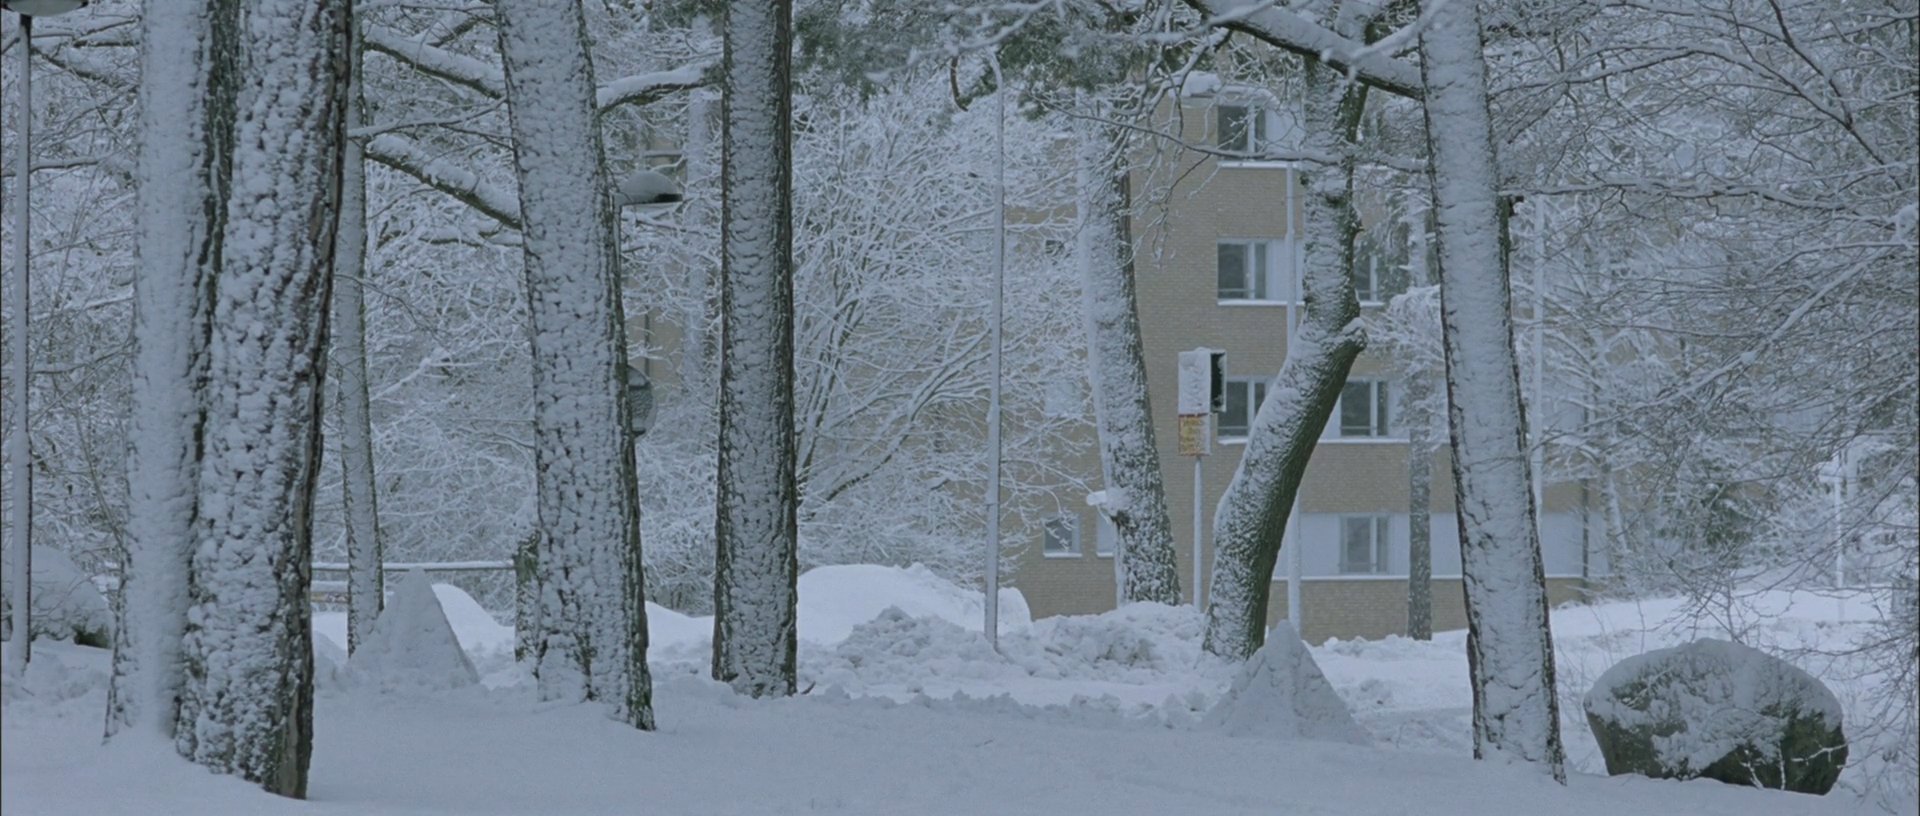
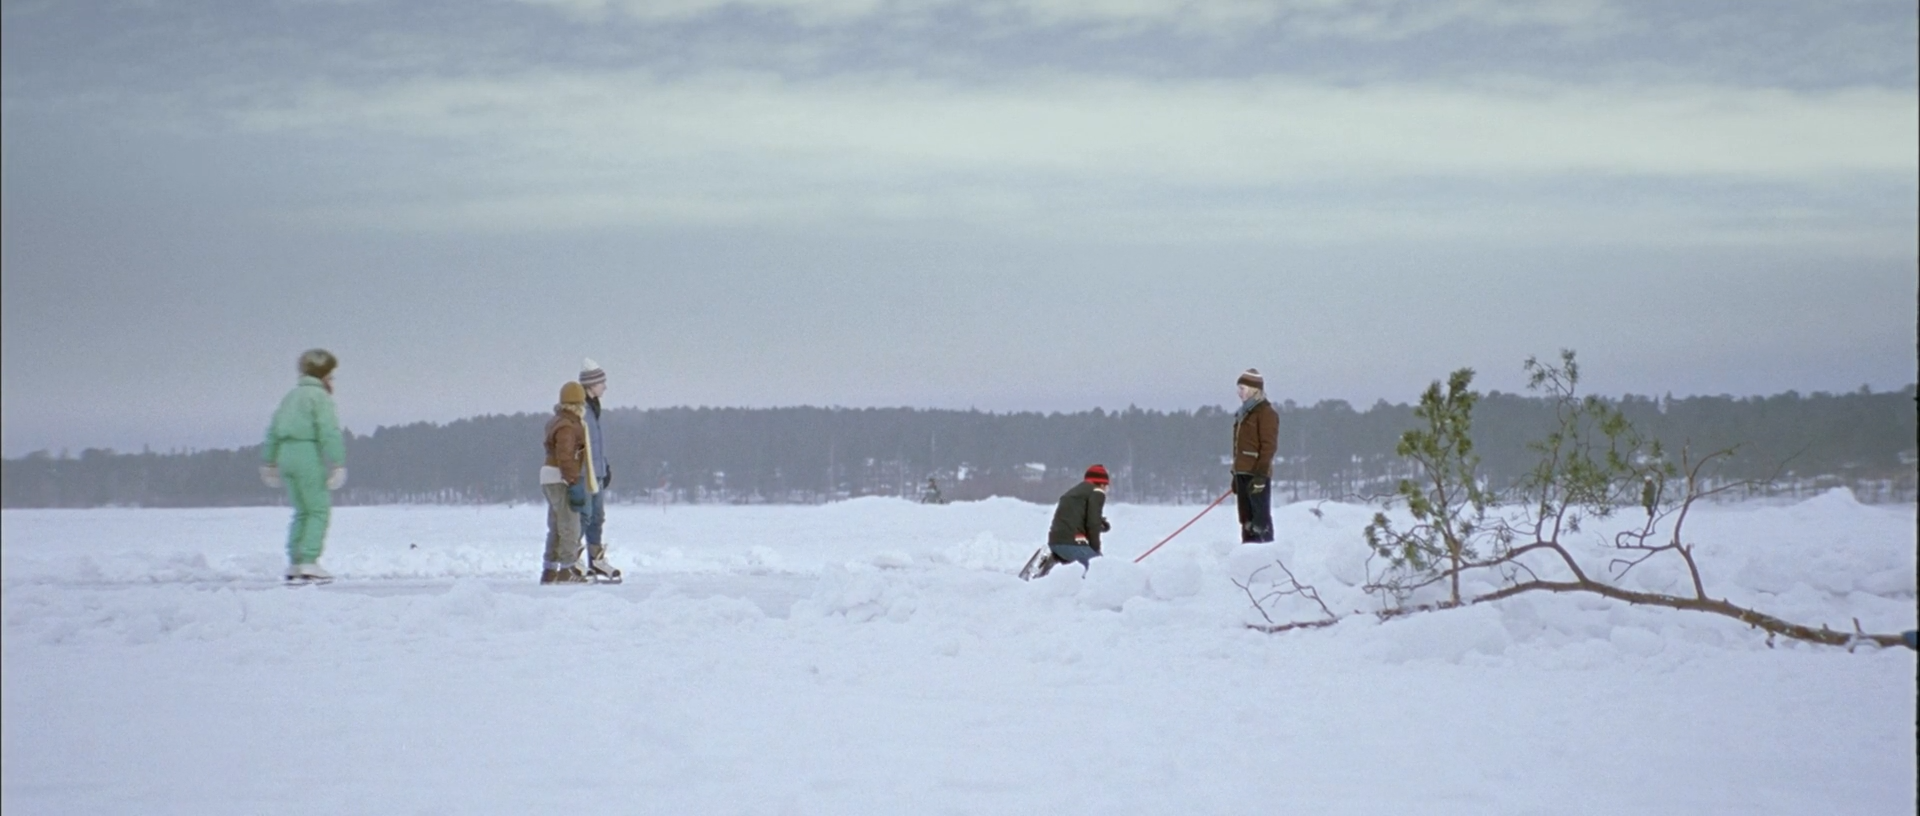
Let the Right One In does not treat winter white as blank neutrality. Snow can be dim blue-grey under night trees, nearly luminous beneath overcast sky or split into soft planes by branches and distant architecture. Four studies here are explicit snow landscapes: the birch clearing, the woods before a housing block, the frozen lake and the final snowy shoreline.
Away from the snow, colour is sparse and consequential. A face can sit inside dirty green darkness; red furniture can divide a room from cyan-green shadow; cold pool water can suppress almost every warm cue. This report reconstructs those visible relationships while separating what exposure, weather, production design, animal/stunt work and possible VFX must supply before the grade.
Subject
Let the Right One In
Studies
8 frames
Measured against
703 eligible midpoint frames
Interpretation
gamma24
The film-level construction
What holds the look together
White contains depth and temperature
Snow ranges from dim steel-blue to near-white while retaining ridges, footprints, branches and horizon separation. Neutralizing all snow to equal RGB or pulling every patch below clipping removes both weather and space.
Chroma is small but decisive
A scarf, room, wet face or distant practical may occupy little of the frame, yet its colour carries more attention because the surrounding world is restrained. Global saturation changes disturb this hierarchy quickly.
Faces belong to their environments
Skin is allowed to cool beside snow, green beside dark glass or cyan underwater. The finish preserves facial volume and selective warmth without pulling every complexion toward a generic skin-line target.
Thresholds divide the world
Windows, tree lines, doorways, water surfaces and dark reveals separate zones of exposure and colour. Local shaping follows these real boundaries; generic centre-weighted vignettes weaken the architecture.
Resolve blueprint
A node tree built to be adjusted, not copied blindly
Normalize known camera originals into DaVinci Wide Gamut / DaVinci Intermediate with Resolve Colour Management or a documented input CST. Establish snow and skin exposure before palette work. A gamma-2.4-to-working-space transform may be used to compare the supplied reference, but it does not turn that encoded frame back into a camera negative.
Use separable branches for snow, skin/costume and environmental colour. The film's restraint depends on preserving distinctions inside near-neutral fields: blue-grey snow, cream skin, brown hair and pale concrete must not become one desaturated surface. Suggested settings are starting ranges for suitable log/raw footage, never recovered originals.
Group Pre-ClipL01
Input transform
Normalize camera and VFX sources correctly before interpreting cool snow, pale skin or restrained chroma as a creative look.
Do this
Decode raw from camera metadata or transform documented log/gamut into DaVinci Wide Gamut / DaVinci Intermediate.
Give plates, reflections and CG elements their correct input transforms before compositing.
If project colour management already performs the IDT, omit this node rather than doubling it.
Starting points
Keep creative tone mapping out of the input stage and reserve display mapping for L12.
For the supplied reference only, use Rec.709 gamut and provisional gamma 2.4 as an explicit comparison assumption.
Watch
A wrong transfer curve makes snow placement and shadow separation impossible to judge.
Confirm data/video levels before treating a lifted floor or clipped white as intentional.
Clip · serialL02
Exposure and neutral anchor
Place exposure and white balance from credible neutrals without erasing environmental coolness or motivated interior colour.
Do this
Use Offset for the large exposure move, then HDR Global or Log wheels for smaller zone placement.
Choose a real neutral only after inspecting source context; blue-grey snow under open sky is not automatically a balance error.
Set facial exposure from texture and modelling before selective skin work.
Starting points
Begin within roughly ±0.35 stop on well-exposed log material.
Keep temperature/tint corrective; build deliberate snow or room colour in later branches.
Watch
Auto-neutral snow can push skin and practicals artificially warm.
Lifting a dark interior globally exposes noise and destroys doorway or window hierarchy.
Clip · serialL03
White-field contrast
Build a soft snow shoulder and a graduated toe while preserving separation at both extremes.
Do this
Use Custom Curves or HDR zones to hold texture in bright snow without lowering the whole image.
Shape the toe so trunks, hair and unlit rooms can approach black while retaining essential edge steps.
Keep midtone contrast restrained in fog, overcast snow and pale interiors.
Starting points
Try contrast around 1.04–1.16 with pivot 0.42–0.52, then shape toe and shoulder separately.
Use HDR Highlights/Specular or a soft curve before hard clipping or broad gain reduction.
Watch
Grey highlight recovery makes clean snow look dirty.
A hard shoulder removes ridges and makes the sky merge with the ground.
Clip · serialL04
Cool-neutral palette
Converge blue-grey, green-grey and muted brown families while keeping useful temperature differences inside near-neutral material.
Do this
Use broad shallow Hue vs Hue moves rather than narrow spikes in snow and concrete.
Reduce off-palette colour with Hue vs Sat before desaturating globally.
Use Color Warper with pins around skin, red story accents and the intended cool-neutral axes.
Starting points
Start with 2–8 degree hue rotations and 10–25% reductions on competing families.
Judge colour at normal size; tiny blue variations in snow may be value texture rather than unwanted chroma.
Watch
Neutralizing all cool areas removes atmosphere and depth.
Large warps create contouring across pale gradients and compressed snow texture.
Clip · parallelL05
Skin, hair and costume
Preserve faces and narrative costume accents without separating them from snow, green interiors or underwater light.
Do this
Build broad pre-look HSL/RGB keys and combine them with tracked windows when hair, walls or costume overlap.
Correct luminance and density before making small hue moves.
Treat yellow, red, mint or plaid costume accents on separate protected branches when they carry the composition.
Starting points
Key Output Gain of 0.25–0.60 and exposure moves inside ±0.30 stop are safer starting tests than full correction.
Keep hue moves within roughly 2–6 degrees unless the production colour itself is wrong.
Watch
Cold skin is not failed skin when the environment is cold.
Inspect fine blond hair, wet hair, fur and motion blur for matte chatter.
Clip · parallelL06
Snow and pale environment
Control snow, sky, concrete and other pale fields independently from people, trunks and dark architecture.
Do this
Combine a broad luminance key with spatial windows following the ground, sky or facade.
Adjust snow density and temperature with HDR Highlights/Gain and small RGB curves rather than one white-balance move.
Use local contrast sparingly to reveal ridges, footprints and branch shadow without making snow crunchy.
Starting points
Try ±0.10–0.30 stop and subtle blue/cyan density changes before saturation.
Feather landscape windows broadly across natural depth transitions.
Watch
A luma-only key may grab pale skin, fur and buildings.
Excess local contrast turns fine grain and compression into false snow texture.
Clip · parallelL07
Interior colour fields
Separate red, green, amber or cyan architectural colour from skin and neutral fixtures.
Do this
Use broad hue/luminance keys intersected with room geometry for walls, furniture and practical spill.
Change density before saturation and preserve material variation within each colour family.
Feed conflicting environmental colours into a Parallel Mixer rather than fighting them in one serial node.
Starting points
Lower keyed gamma 0.05–0.18 before adding 5–20% saturation.
Use large spatial mattes that follow doorways, windows and furniture planes.
Watch
Uniform room tints make skin and pale fixtures synthetic.
Narrow keys on encoded material reveal block boundaries and edge chatter.
Clip · serialL08
Local hierarchy
Use broad tracked shaping to hold faces, figures, tree lines and thresholds without visible relighting.
Do this
Use large soft windows for face lift, negative fill, doorway control and landscape separation.
Track only the necessary motion parameters and manually repair drift.
Use Outside Nodes where a protected subject sits inside a snow or room adjustment.
Starting points
Prefer local exposure moves of roughly ±0.10–0.30 stop with very soft feathering.
Align landscape windows to real horizon, trunk or architectural boundaries.
Watch
Generic centre vignettes weaken the film's edge-based compositions.
A local lift cannot replace missing key light or clipped snow detail.
Clip · serialL09
Luminance-dependent colour
Keep shadows quiet and highlights clean without stripping environmental colour from either range.
Do this
Use Sat vs Lum or luminance keys to taper chroma only at the noise floor.
Reduce saturation gently in the brightest snow or water only when channel imbalance becomes distracting.
Use gamut compression before output clipping, especially for red interiors and cyan water.
Starting points
Test a 15–40% saturation reduction below the lowest 5–10% of signal.
Confine highlight taper to the upper 5–8% before broadening it.
Watch
Desaturating all highlights turns snow and pale skin lifeless.
Chroma noise can masquerade as subtle green ambience in dark rooms.
Clip · optionalL10
Texture and atmosphere
Preserve fine snow, skin, fur, water and room texture while matching diffusion, grain and atmospheric softness.
Do this
Apply conservative temporal/spatial noise reduction before texture work and grain.
Use Midtone Detail or region-specific blur sparingly; snow and skin require different treatment.
Add fine delivery-scale grain after resizing and most sharpening, then inspect moving footage at 100%.
Starting points
Start Midtone Detail between roughly −12 and +8 depending on region.
Use low-strength fine grain with restrained chroma; do not copy the encode's compression texture.
Watch
Denoise can smear snow sparkle, wet hair and fur boundaries.
Added grain may turn large pale fields into compression crawl.
VFX / Clip · parallelL11
VFX, reflection and animal integration
Match any plates, animal elements, reflections or cleanup to the photographed scene before the common grade.
Do this
Normalize elements separately, then match exposure, source direction, focus, motion blur and lens distortion with the look bypassed.
Rebuild occlusion, contact shadow and reflected spill before applying room colour.
Match element-specific noise first and add shared finishing grain only after the composite holds at delivery resolution.
Starting points
Compare foreground, reflection and deep background at 100% across adjacent frames.
Use edge treatment appropriate to focus distance rather than one global matte blur.
Reflections with the wrong parallax or sharpness become more obvious after contrast and colour convergence.
Group Post-ClipL12
Output transform and trim
Render the scene-referred grade to the calibrated delivery while keeping display-specific trims out of the shared look.
Do this
Use Resolve Colour Management or a CST from DWG/Intermediate to the required gamut and transfer.
Enable suitable tone and gamut mapping, then inspect snow texture, red furniture and cyan water for compression.
Create separate SDR, HDR or alternate-display trim versions rather than changing the scene-referred graph.
Starting points
For comparison with the reference PNGs, monitor Rec.709 gamma 2.4 in controlled surround.
Use soft clip only as a final guard, not as the main snow shoulder.
Watch
A double output transform shifts both snow temperature and black placement.
Review the encoded deliverable for banding in snow, water and dark green gradients.
8 reconstruction studies
Read the image first; use the scopes to test the read
Each study begins with a literal visible description, then tests the read with active-picture measurements. Metrics describe the whole midpoint and cannot identify snow, skin, trees, cats or water without the visual inspection recorded in the prose.
Build the base with every optional node bypassed. Add only the named shot operations, check mattes at full resolution and inspect moving footage before approving qualifiers, tracked windows, animal/reflection integration or temporal texture.
01 · Snow study I · night clearing · shot 43 · 01:10:54:20
White figures inside black birches
A pale-clothed figure bends beneath an inverted child as a white dog crosses the snow; vertical birch trunks and the unlit forest divide the scene into alternating light and dark bands.
Pale clothing, dog and snow remain distinct inside a dim blue-grey field, cut by near-black birch trunks and forest gaps.
What is remarkable
This snow scene is dark without losing the idea of white. The ground, clothing and dog occupy different blue-grey values rather than approaching display white, while the tree trunks and forest gaps form a near-black vertical grid. More than half the frame lies in the configured shadow zone and mean chroma is only about 4 C*, yet the action remains legible through silhouette and local value separation.
The small red mark near the figures matters because almost every larger area is cool or neutral. It does not need more saturation; its scarcity makes it visible. The dog's fur also remains slightly distinct from both clothing and snow through texture and shading, a separation that broad highlight keys can easily erase.
Where the image comes from
Night exterior exposure, real snow, white costume and the practical/stunt arrangement must precede grading. A large soft source or ambient snow bounce needs to separate pale surfaces without filling the forest. The grade can cool and compress the snow family, deepen trunks, protect the red accent and refine local hierarchy, but it cannot recreate clean fur, cloth or face detail from a noise-floor capture.
Set black and snow exposure first. Use a broad snow/pale branch intersected with landscape windows, then protect the dog and figures with softer local mattes. Preserve slight density differences; do not force everything pale to a shared white point.
Waveform
RGB distribution
Vectorscope
Can regular footage get there?
Conditional
Regular log/raw night footage can approach the frame when snow provides real ambient bounce and pale subjects are exposed above the noise floor. Underexposed compressed material cannot sustain the required fur, cloth and tree separation.
Minimum capture conditions
Real or physically convincing snow with broad soft illumination and controlled forest fill.
Pale costume and dog fur recorded with texture despite the low display key.
Enough log/raw exposure for a deep toe without chromatic noise around figures and trunks.
Composite and background read
A practical clearing and performance remain plausible
Footing, occlusion, snow contact and shared soft light are coherent. Rig removal, animal handling or cleanup is plausible, but the still shows no decisive matte edge.
Only moving footage or production documentation could establish stunt support, wire removal or animal compositing.
Shot-specific Resolve pass
Use the global tree, then make these decisions
L03
Place snow below white
Use HDR Highlights/Gain and a soft shoulder to keep snow, clothing and fur in a dim blue-grey range with distinct upper values.
Why: The scene reads as white because of relationships, not because snow reaches peak display white.
Watch: Do not lower all pale material to the same grey.
L06
Separate pale surfaces
Intersect a broad pale-material key with ground and subject windows; adjust snow, clothing and dog density independently by small amounts.
Why: Material separation must survive the restricted palette.
Watch: Keep soft fur and cloth edges free of luma-key halos.
L08
Deepen the birch grid
Use large vertical/forest windows to lower unlit gaps and selected trunks without applying a generic vignette.
Why: Alternating dark bands provide structure and isolate the action.
Watch: Trees should retain bark texture rather than become hard black bars.
L05
Hold the small red cue
Protect the red mark from broad cool-neutral convergence and adjust only if it loses visibility after contrast.
Why: Its narrative force comes from rarity, not maximum saturation.
Watch: Do not let the key pick skin or brown bark.
Failure modes to check before approval
Snow, clothing and fur collapsing to one flat grey.
Chromatic noise around the pale figures after toe shaping.
Artificial halos along dog fur and birch edges.
An over-saturated red accent that breaks the restrained world.
02 · Snow study II · housing woods · shot 140 · 01:30:12:10
A concrete block recedes into blue-white trees
Snow-covered birches fill the foreground and midground before a pale apartment slab, with trunk density and subtle blue-grey steps supplying almost all of the depth.
Blue-grey snow and pale birches layer toward a housing block; a bent trunk, dark rock and narrow shadow bands keep the high-key field dimensional.
What is remarkable
This is high-key winter without blank white. Mean lightness is close to 49 L*, highlights occupy only a small fraction of the measured frame and the dominant palette stays within slate-blue and grey. Snow, bark and building separate through small value and temperature changes rather than through chroma.
The bent foreground trunk and dark boulder stop the field from floating away, while the apartment remains slightly flatter and warmer-grey than the woods in front. That depth ordering is easy to destroy if the grade neutralizes every pale surface or applies equal local contrast at all distances.
Where the image comes from
Overcast weather, snow coverage, production timing and lens depth establish the near-monochrome world. Exposure needs to hold fine snow and bark while keeping the building quiet. Grading can cool the snow family, align stray hues, shape foreground contrast and compress the background, but cannot manufacture real atmospheric depth from a sunlit or snowless plate.
Build a gentle white-field contrast curve, then use large depth-based windows rather than object-tight keys. Keep the foreground trunk and boulder as anchors while allowing the building to sit in a narrower, softer range.
Waveform
RGB distribution
Vectorscope
Can regular footage get there?
High
Overcast snow footage captured with protected highlights can reproduce this palette and depth using standard scene-referred balance, curves and broad local shaping. The main conditions are real weather and disciplined exposure.
Minimum capture conditions
Overcast or diffused winter light with no hard warm sun contamination.
Snow and bark texture protected in camera without severe underexposure.
Foreground, tree and building layers separated by real depth, haze and lens rendering.
Composite and background read
The woods and building read as one photographed environment
Perspective, occlusion, snow accumulation and atmospheric softness are coherent from the front trunks to the apartment.
Invisible cleanup or a subtle building extension cannot be excluded, but this midpoint presents no specific integration failure.
Shot-specific Resolve pass
Use the global tree, then make these decisions
L02
Respect the blue-grey anchor
Balance against a credible pale surface without forcing snow to equal RGB; keep the overcast coolness visible.
Why: The environment's temperature is part of its depth and weather.
Watch: A warm neutralization makes the apartment and snow feel like different sources.
L03
Open a soft white field
Raise the pale range with a restrained shoulder, holding bark grooves, snow piles and the apartment facade below hard clip.
Why: High key should remain textured and layered.
Watch: Grey recovery can make clean snow look muddy.
L06
Grade depth in broad planes
Use large foreground, woods and building windows for small density and temperature differences, with the background slightly softer and quieter.
Why: Spatial depth lives inside a narrow near-neutral palette.
Watch: Avoid object-shaped masks around every trunk.
L10
Preserve snow and bark texture
Use minimal denoise and region-specific texture; keep distant detail softer than foreground trunk detail.
Why: Uniform crispness flattens the layered winter air.
Watch: Do not sharpen grain into false bark or snow sparkle.
Failure modes to check before approval
Clipped snow ridges and building windows.
Equal-RGB snow that loses the overcast atmosphere.
Uniform local contrast from foreground to apartment.
Blue banding across pale sky and snow gradients.
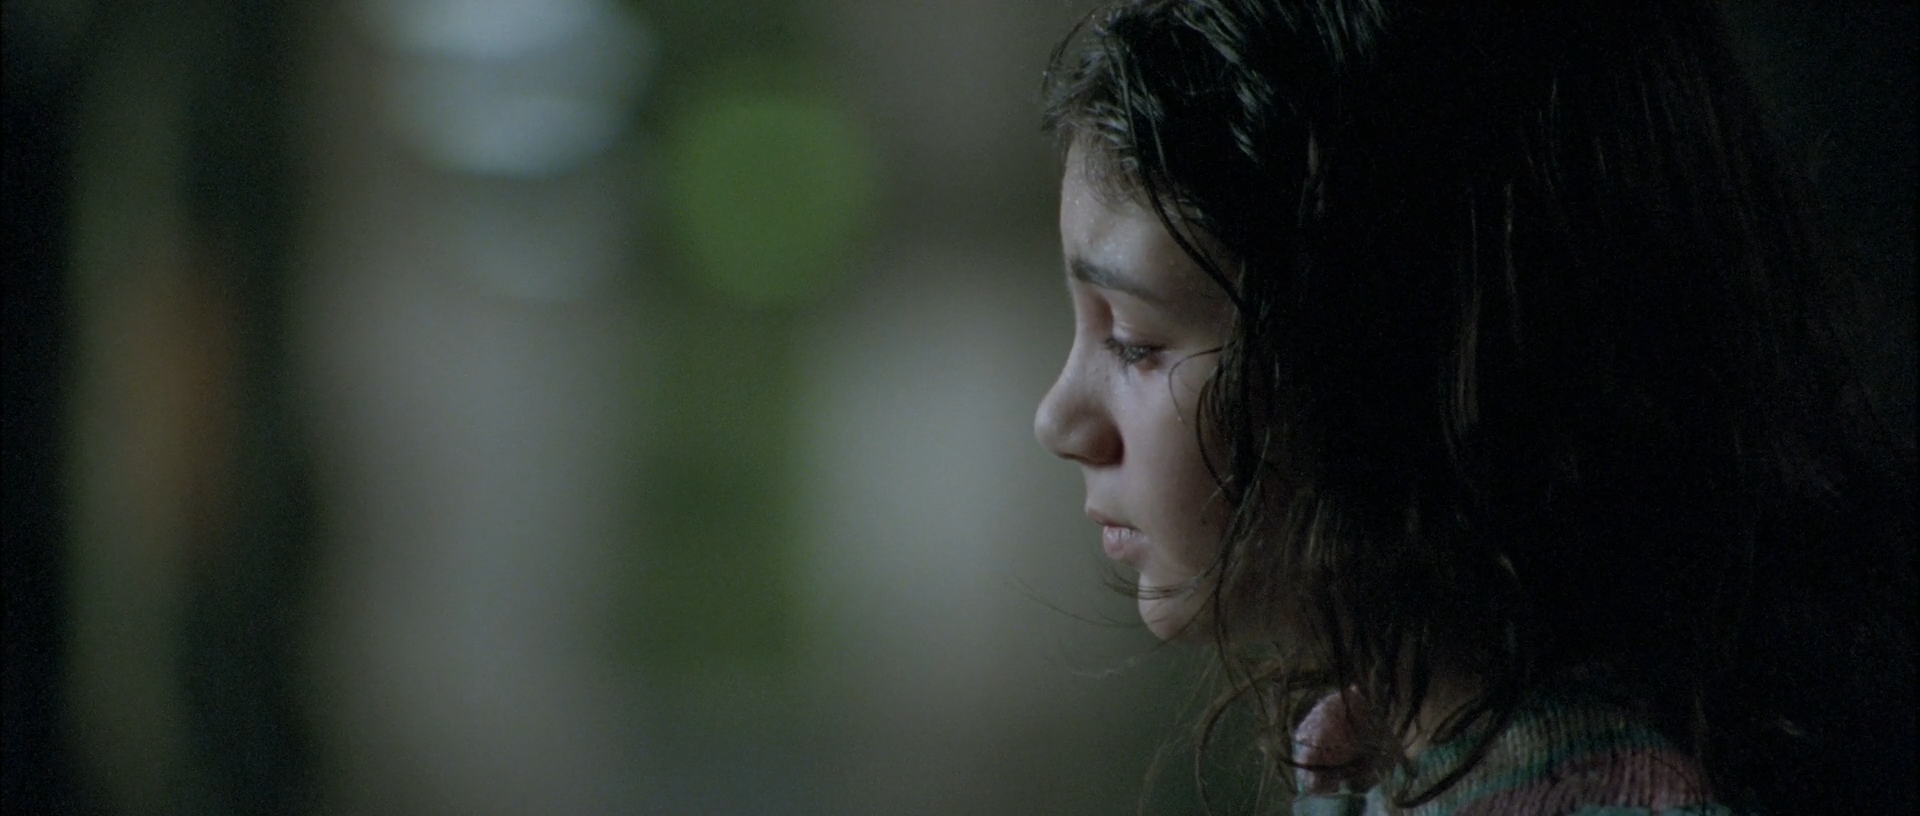
03 · A face at the green threshold · shot 265 · 01:50:52:05
One cheek emerges from dirty green dark
A dark-haired girl's profile is held by soft side light while wet-looking hair and the room behind her fall through muted green-grey into black.
Soft side light models one cheek and nose; dark hair and an unfocused green-grey room recede without a conventional warm skin correction.
What is remarkable
The portrait separates face from darkness with very little chroma and no bright highlight. Mean lightness is about 14.5 L*, more than sixty percent of the frame lies in the configured shadow zone and the palette is built from near-black, green-grey and muted skin. The cheek remains readable because its value gradient is clean and the background is softer, not because the face has been pushed warm.
Hair is the difficult boundary. It crosses from skin into green-black with wet or clumped texture that can disappear under denoise or aggressive qualifiers. The soft circular background shapes remain subdued and provide spatial context without becoming decorative bokeh colour.
Where the image comes from
The source direction, face exposure, dark hair texture and background distance must be photographed. A low soft key and real negative fill create the narrow cheek-to-black transition. Grading can lower the room, refine green contamination, protect skin density and manage noise, but cannot relight an unmodelled face or rebuild hair recorded below the noise floor.
Set exposure and toe before any skin key. Use a broad face window with a restrained pre-look mix, leaving some environmental green in the shadows. Apply denoise before texture and assess the hair boundary in motion.
Waveform
RGB distribution
Vectorscope
Can regular footage get there?
Conditional
The look is achievable from ordinary log/raw portrait footage if the low side light records cheek and hair texture cleanly. Compressed underexposure will break as soon as the face is separated from the green-black background.
Minimum capture conditions
A broad low side source with genuine modelling and controlled negative fill.
Face and dark hair recorded above the sensor noise floor.
Background distance and lens rendering sufficient to create soft separation physically.
Composite and background read
No visible reason to invoke compositing
Focus falloff, hair edges, facial light and background blur behave as one photographic setup.
A still cannot exclude cleanup or invisible background work, but no positive cue points to it.
Shot-specific Resolve pass
Use the global tree, then make these decisions
L02
Place the cheek before the room
Use Offset and a small midtone correction to retain the cheek gradient without opening the dark background.
Why: The portrait's exposure is local, not a globally visible room.
Watch: Do not balance the face to conventional warmth.
L03
Build a soft green-black toe
Lower the room and hair-shadow floor gradually while preserving a narrow edge step around the profile.
Why: Deep but graduated shadow provides shape.
Watch: Avoid a hard black outline around hair and chin.
L05
Protect skin volume
Combine a broad skin key with a soft tracked face window; mix back a small amount of pre-look luminance and texture.
Why: The cheek needs readable volume while staying environmentally cool.
Watch: Inspect eyelashes, lips and wet hair for matte chatter.
L10
Treat hair and skin separately
Apply conservative shadow denoise, then use slight negative Midtone Detail on skin without blurring the hair clumps.
Why: Texture differences carry the portrait at low exposure.
Watch: Temporal smoothing must not trail the profile or smear fine hair.
Failure modes to check before approval
Skin warmed away from the green environment.
Denoise smearing wet hair into a solid black mass.
A face window that leaves a visible oval in the background.
Lifted shadows revealing fixed-pattern or chromatic noise.
04 · Snow study III · frozen lake · shot 343 · 02:02:26:14
Tiny figures hold an immense white plane
Five small figures, a fallen branch and a dark tree line break a frozen lake and pale sky whose values sit overwhelmingly in the top of the measured range.
Small coloured figures and a fallen branch punctuate a high-key frozen lake; the distant forest line keeps pale ground and sky spatially distinct.
What is remarkable
This is the report's most demanding white-field exposure. Roughly seventy-seven percent of the midpoint meets the configured highlight threshold, yet the snow, sky and horizon do not merge into one clipped plane. The lake is slightly denser and more textured than the sky; a dark forest line supplies scale; the branch creates foreground depth.
Colour is carried by very small human shapes. Mint, mustard, brown and a red cap remain present without becoming graphic cutouts. Because the surrounding field is so restrained, even modest costume saturation reads strongly. The grade must protect those accents while keeping snow free of chromatic contouring.
Where the image comes from
Overcast lake conditions, real snow texture, horizon visibility, blocking and wardrobe are primary. Exposure must protect the brightest field while giving small figures enough signal. Grading can place snow and sky on separate high-key tiers, cool the environment, hold costume colours and manage the dark horizon, but cannot recover a clipped landscape or add convincing scale to a flat white plate.
Use snow and sky branches with broad horizontal windows, then a restrained costume/skin protection pass. Keep the branch and tree line dense enough to frame the people. All keys need motion testing because tiny figures and pale edges are unforgiving.
Waveform
RGB distribution
Vectorscope
Can regular footage get there?
Conditional
The look is reproducible from properly exposed overcast snow footage, but only if highlight channels remain intact and the small figures are recorded with enough colour and edge detail. Clipped snow is an irreversible failure.
Minimum capture conditions
Log/raw highlight latitude across a field dominated by snow and pale sky.
A visible horizon and foreground branch or equivalent depth anchors.
Costume colours chosen and exposed to survive restrained high-key grading.
Composite and background read
A practical frozen landscape is the visible baseline
Figure scale, horizon, branch contact and snow texture are coherent. Sky work or cleanup remains plausible but is not visually required by this still.
A single midpoint cannot reveal sky replacement, rig removal or safety cleanup that may appear only in motion.
Shot-specific Resolve pass
Use the global tree, then make these decisions
L03
Separate sky from lake
Use a soft shoulder and broad horizontal shaping to keep the sky slightly distinct from the snow while preserving texture in both.
Why: Two pale tiers create atmosphere and scale.
Watch: Do not introduce a visible gradient seam at the horizon.
L06
Protect snow relief
Combine a luminance key with a lake-shaped window for small density and local-contrast adjustments around tracks, branch and figures.
Why: The white plane must remain materially snow rather than blank graphic white.
Watch: Avoid crunchy halos around the branch and feet.
L05
Keep costume punctuation
Protect mint, mustard, brown and red costume families from global cool-neutral convergence; change density before saturation.
Why: Tiny human colour carries disproportionate attention.
Watch: Do not turn the figures into oversaturated cutouts.
L09
Check the top channels
Taper highlight saturation only where channel imbalance or gamut pressure appears, then inspect the output transform.
Why: Snow should remain cool and clean without coloured clipping.
Watch: Broad highlight desaturation will bleach the figures and horizon.
Failure modes to check before approval
Clipped white snow with no surface relief.
A sky/lake window seam along the forest line.
Costumes saturated beyond the restrained environment.
Blue or magenta contouring across pale gradients.
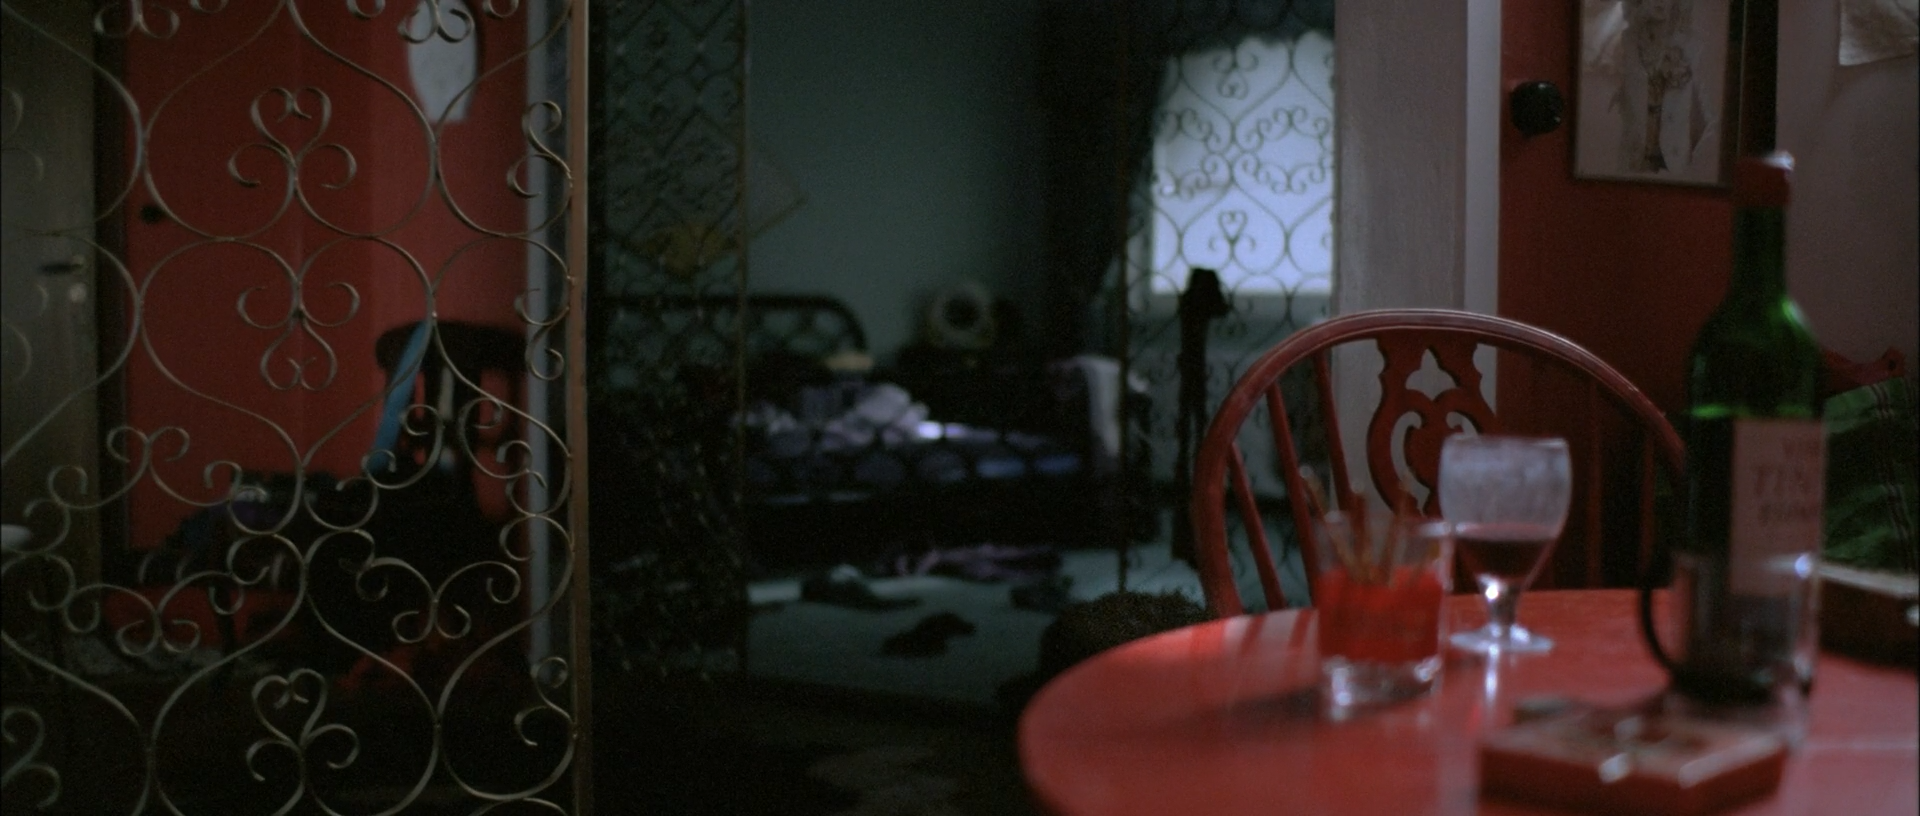
05 · A room split by colour · shot 424 · 02:11:41:10
Red furniture faces a green-black chamber
A red table, chair and wall occupy the foreground while ornate metalwork opens onto a darker green-cyan room, with a wine glass and bottles bridging the two fields.
Red furniture anchors the near room; an ornate screen and pale window divide it from a green-black bed chamber behind.
What is remarkable
The frame uses production design to create two colour zones that are not globally balanced against each other. Red furniture and wall paint dominate the foreground, while the room beyond the ornate screen falls into cyan-green black. The pale patterned window is a small neutral-cool bridge; the wine glass and bottles provide specular points without becoming the focus.
The measured frame is still mostly dark, with more than eighty percent in the configured shadow zone. Red therefore reads through local density rather than raw brightness. The black screen and doorway geometry prevent the two palettes from bleeding into a single muddy complementary wash.
Where the image comes from
Red furniture, wall colour, screen geometry, practical source direction and the cooler rear room must exist in production. Grading can converge the reds, deepen the rear greens, manage reflections and keep the window pale, but cannot convincingly create the division from a neutral room with uniform white light.
Use parallel environmental branches following the screen and doorway. Protect the glass and pale window from both. Shape the foreground table and background bed at different density levels so the colour split remains spatial, not merely chromatic.
Waveform
RGB distribution
Vectorscope
Can regular footage get there?
High
Footage from a genuinely red foreground and cool/green rear room can be finished with standard scene-referred curves, parallel colour branches and broad architectural windows. The production palette is the non-negotiable input.
Minimum capture conditions
Red surfaces with internal material variation rather than a post-only neutral set.
A separately lit or naturally cooler rear room and a real dark threshold between zones.
Protected glass, bottle and window highlights with no red-channel clipping.
Composite and background read
The room reads as a coherent practical interior
Occlusion, screen detail, reflections and source falloff align across foreground table and rear room.
Invisible window replacement or cleanup cannot be excluded, but the still supplies no positive evidence for it.
Shot-specific Resolve pass
Use the global tree, then make these decisions
L03
Build two density tiers
Keep the foreground table in the lower mids while placing the rear room deeper, with a soft shoulder on glass and window reflections.
Why: Value separates the colour fields before hue does.
Watch: Do not crush the ornate screen into a flat divider.
L07
Converge foreground reds
Key red wall, table and chair broadly within the foreground geometry; lower gamma slightly and align orange-red variants without flattening material differences.
Why: Dense related reds create the near-room identity.
Watch: Keep wine, wood and painted surfaces from becoming identical.
L07
Deepen the rear green
On a separate parallel branch, shape the bed chamber toward muted cyan-green and reduce unrelated warm contamination.
Why: The rear field needs its own black and chroma behaviour.
Watch: Avoid a hard matte line through the patterned window and screen.
L09
Control coloured shadows
Taper saturation at the deepest noise floor while retaining red and green gradients immediately above it.
Why: The room should contain coloured darkness, not red-green codec crawl.
Watch: Do not neutralize the threshold where the two fields meet.
Failure modes to check before approval
A global complementary tint contaminating skin-neutral and glass areas.
Red-channel clipping in table and wall reflections.
A visible architectural matte seam through the screen.
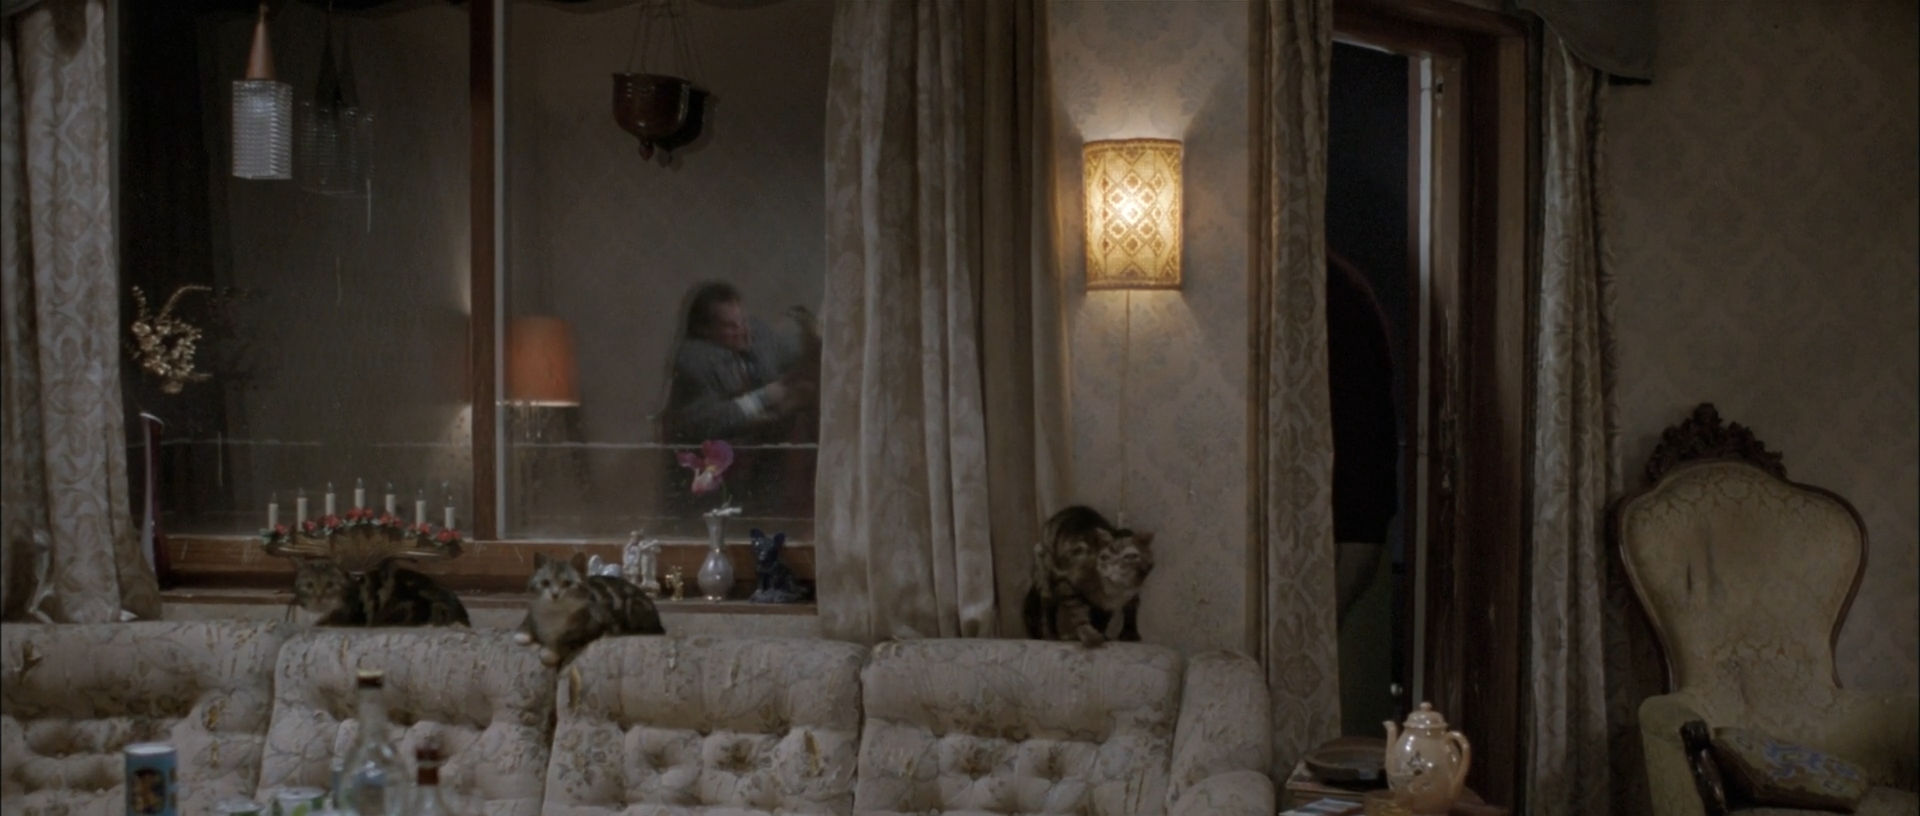
Several cats sit or move across a cream sofa while a darker reflected or windowed zone carries blurred human action, forcing fur, upholstery, glass and depth to share one subdued warm-grey finish.
Regular-footage feasibility: Low · useful referenceComposite/VFX read: medium
Cats and pale upholstery share the foreground; a darker glass/reflection zone carries blurred human action beneath one warm practical.
What is remarkable
The image is deliberately low in chroma despite ornate production design. Cream upholstery, grey-brown walls, fur and curtain fabric separate through texture and modest value changes, while the wall sconce is the only compact warm source. The cats do not receive an artificial brightness boost; their silhouettes and eye/head shapes emerge against the sofa and glass.
The difficult area is the depth/reflection layer. Foreground cats, sofa, glass, curtains and blurred human action occupy different focus and contrast regimes but still share the same room atmosphere. Any assembled element must inherit the practical's direction, the glass's veiling contrast and the finishing texture without becoming sharper or cleaner than its plane.
Where the image comes from
Animal performance, set dressing, upholstery, sconce placement, reflection design and any safety or VFX plan must be solved in production and compositing. Grading can unify cream and brown families, hold fur separation, shape the sconce and integrate plates through shared contrast and grain, but it cannot create convincing contact, parallax or coordinated animal action from one ordinary plate.
Integrate every animal or reflection element with the look bypassed. Match contact shadow, focus, motion blur, glass contrast and source direction first. Only then apply the restrained warm-grey palette and final room texture.
Waveform
RGB distribution
Vectorscope
Can regular footage get there?
Low · useful reference
The colour grade itself is accessible, but the complete image is not a generally reproducible candidate from regular footage. Multiple animals, layered depth/reflection and human action require production control and may require plate or VFX work beyond grading.
Minimum capture conditions
Planned animal performance or separate plates with correct eyelines, contact and focus distance.
A documented reflection/window strategy with matching parallax and practical-light response.
Element-specific noise, sharpness and motion blur that survive the shared low-contrast finish.
Composite and background read
Layered animal and reflection work is strongly plausible
Coordinating several cats across furniture while retaining separate blurred human action through a glass/reflection layer is production-demanding. The multiple focus regimes and controllability needs make separate plates, cleanup or composite assistance plausible, although the still exposes no definitive matte seam.
This is an inference from visible complexity and production demand, not a claim about the credited method. A carefully staged practical take could account for more of the image than the still reveals.
Shot-specific Resolve pass
Use the global tree, then make these decisions
L11
Integrate with the look bypassed
Match every animal, reflection or background element for perspective, focus, motion blur, source direction, contact shadow and glass contrast before creative grading.
Why: A shared warm wash cannot repair physical inconsistencies.
Watch: Inspect paws, sofa contact, eye highlights, curtain edges and reflected action frame by frame.
L03
Keep a quiet cream value ladder
Use a gentle toe and shoulder to separate fur, sofa, curtains and wall without making the ornate room crisp or bright.
Why: Subdued value differences hold the layered composition together.
Watch: Do not make every pale textile the same grey.
L04
Unify without bleaching
Reduce stray chroma and converge cream, warm grey and brown families while pinning the sconce and natural fur variation.
Why: Palette restraint lets depth and texture lead.
Watch: Global desaturation can make fur and upholstery indistinguishable.
L10
Finish texture at delivery size
Match element-specific noise first, then apply restrained shared grain after resize and most sharpening.
Why: Consistent texture hides neither bad edges nor good material detail; it simply places all layers in one image.
Watch: Strong grain will reveal matte boundaries and turn pale fabric into compression noise.
Failure modes to check before approval
Cats with mismatched focus, grain or eye highlights.
Missing or floating contact shadows on the sofa.
Reflected/background action with incorrect parallax or contrast.
A unifying warm wash used to conceal unresolved composite edges.
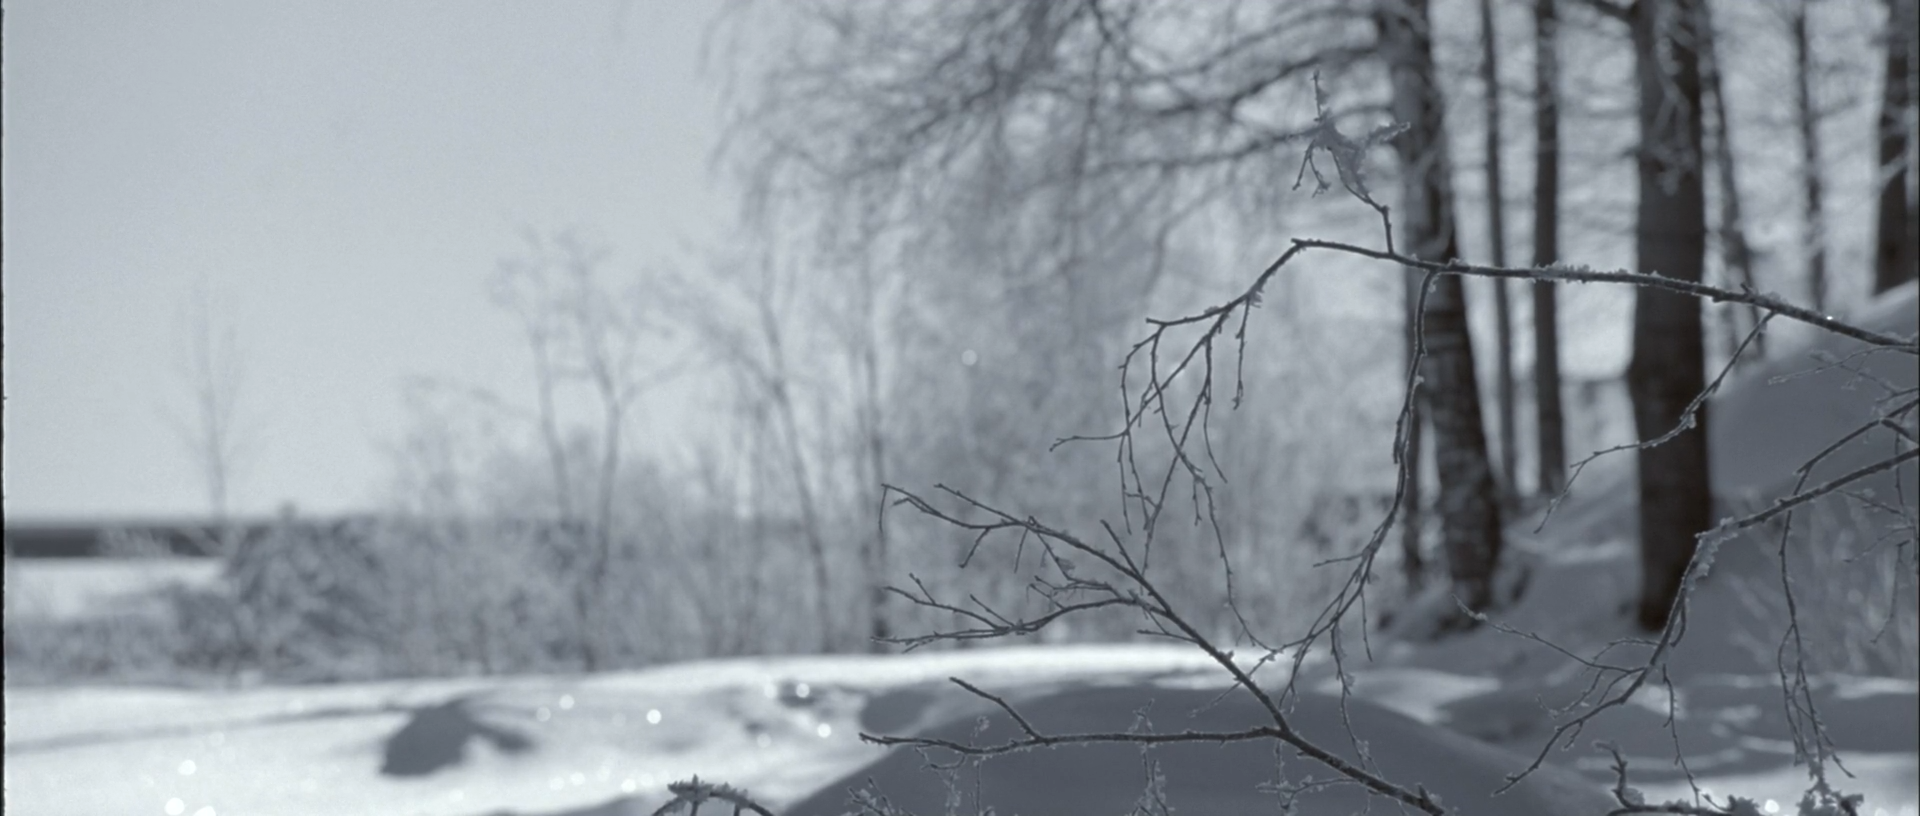
07 · Snow study IV · shoreline · shot 644 · 02:40:26:08
Branches draw on a nearly white horizon
Dark twigs and tree trunks occupy the foreground while snow, frozen water and pale sky fall into broad silver-grey bands, with focus and value doing almost all the spatial work.
Sharp foreground twigs cross soft snow and frozen water; silver-grey bands and a dark right-hand tree line give the near-monochrome landscape depth.
What is remarkable
This is the closest the report comes to achromatic, with mean saturation below 0.10 and mean chroma near 5 C*. Yet it is not visually flat. Foreground twigs are dark and sharp, distant brush is soft, the snow bank carries tiny specular points and frozen water sits between them as a pale horizontal band.
The frame's high contrast is spatial rather than punchy. Dark trees are concentrated at the right and in the crossing branch, while almost half the image meets the configured highlight threshold. If the grade raises local contrast everywhere, atmospheric softness disappears and the landscape becomes brittle.
Where the image comes from
Winter atmosphere, low sun or bright overcast, focus placement and foreground framing generate the image. Exposure must protect the pale shoreline while retaining branch edges. Grading can refine the silver-blue family, shape horizontal bands, hold specular snow points and darken the tree anchor, but cannot synthesize real depth from an evenly sharp or clipped landscape.
Use broad landscape windows and focus-aware texture treatment. Keep the brightest snow clean without forcing neutral white, and let the distant shore remain softer and lower contrast than the foreground branches.
Waveform
RGB distribution
Vectorscope
Can regular footage get there?
High
Properly exposed winter landscape footage with foreground branches and real atmospheric depth can reproduce this near-achromatic finish with standard balance, curve and local-shaping tools.
Minimum capture conditions
Protected snow and sky highlights with visible surface relief.
Real near/far separation in focus, haze and framing.
A dark foreground anchor strong enough to organize the pale horizontal bands.
Composite and background read
The landscape reads as one photographic view
Focus falloff, branch occlusion, snow texture and atmospheric softness are internally coherent.
Invisible cleanup or sky work cannot be excluded, but this still gives no positive reason to invoke it.
Shot-specific Resolve pass
Use the global tree, then make these decisions
L03
Hold pale horizontal bands
Use a soft shoulder and restrained midtone contrast to separate sky, frozen water and snow bank without visible banding.
Why: Layered pale values create the horizon.
Watch: Do not produce a grey strip or hard seam between water and sky.
L04
Keep a silver-blue family
Reduce stray warm contamination and align pale blues and greys gently while preserving tiny temperature differences.
Why: Near-achromatic is not the same as zero chroma.
Watch: Equal-RGB neutralization will make the atmosphere sterile.
L08
Use the branches as anchors
Darken the right tree group and crossing foreground twigs slightly with broad shape-following windows.
Why: Dark asymmetry organizes the broad pale field.
Watch: Avoid edge halos and a generic corner vignette.
L10
Respect focus depth
Preserve sharp foreground twig detail while keeping distant brush and shoreline softly textured; apply finishing grain conservatively.
Why: Focus progression provides most of the depth.
Watch: Global sharpening will turn distant vegetation and snow sparkle brittle.
Failure modes to check before approval
Clipped snow or sky with no internal relief.
Over-neutral whites that remove the silver-blue air.
Edge halos around dark twigs against pale snow.
Uniform sharpening that collapses focus depth.
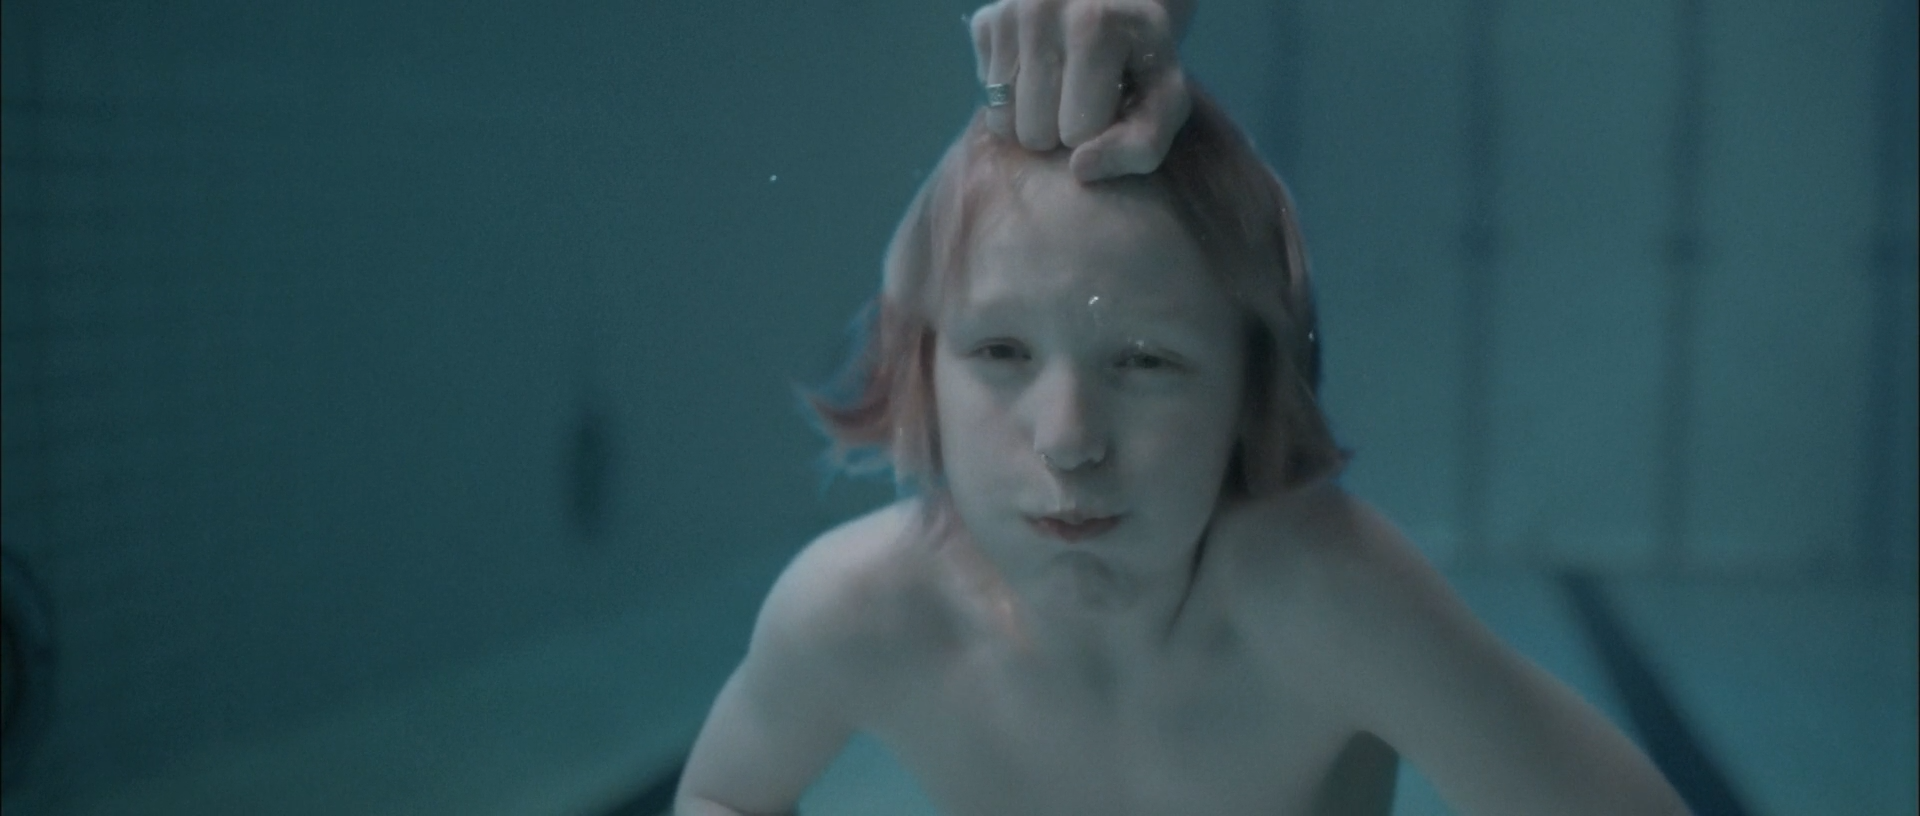
08 · Skin under water · shot 686 · 02:46:06:15
Cyan suppresses warmth but not the face
A submerged boy faces the camera while a hand grips his hair from above; pale skin, bubbles and the pool wall are compressed into a narrow cyan-green range.
Pale skin and a gripping hand remain legible within cyan water; small pink-beige traces in the face survive without breaking the submerged colour field.
What is remarkable
The frame has no conventional white or warm anchor. Water, pool wall, skin and bubbles all inherit cyan-green, but they remain materially distinct through value and local hue. Mean chroma is moderate rather than extreme, and the palette clusters within a narrow teal range. The face reads because eyes, mouth, hair and subtle skin variation survive inside that range.
The gripping hand is brighter and slightly less cyan than the face, creating a disturbing vertical hierarchy from hand to hair to eyes. Removing too much cyan from skin would make the child appear cut out of the water; allowing every value to drift equally cyan would erase facial life.
Where the image comes from
Underwater capture, pool colour, safety/stunt design, light direction and sufficient facial exposure are primary. Water absorption, bubbles and hair behaviour cannot be recreated by a grade. The colourist can align cyan families, protect minimal skin variation, shape the hand and face locally and control gamut/noise, but cannot restore red-channel information that the water and capture never recorded.
Balance for usable channels rather than neutral skin. Build a broad water/environment branch and a low-gain face/hand protection branch from the pre-look image. Keep the water's density and particulate texture intact.
Waveform
RGB distribution
Vectorscope
Can regular footage get there?
Conditional
Regular underwater log/raw footage can approach the colour and value design when skin channels are exposed cleanly and the pool/light already supplies cyan ambience. Footage with a buried red channel or clipped pale skin cannot be graded back to the reference.
Minimum capture conditions
Safe controlled underwater capture with a cyan environment and directional top/front light.
Non-clipped face and hand values with recoverable red-channel information.
Sufficient bit depth for smooth water gradients, bubbles and subtle skin separation.
Composite and background read
Practical underwater capture is visually plausible
Hair, bubbles, skin softness and water distortion behave coherently. Safety cleanup or composited assistance is possible, but no decisive edge mismatch appears in the still.
This midpoint cannot establish the stunt, safety or VFX method; moving footage and production documentation would be required.
Shot-specific Resolve pass
Use the global tree, then make these decisions
L02
Balance for channel survival
Place exposure and tint so face and hand retain texture while leaving the water visibly cyan; do not chase neutral skin.
Why: The submerged environment must remain the dominant colour source.
Watch: Stop if red-channel noise or clipping makes a credible skin branch impossible.
L07
Unify the water field
Key the pool and water broadly, lower gamma slightly and converge blue-cyan-green variants while excluding the face and hand.
Why: A controlled water family surrounds rather than paints the subject.
Watch: Do not erase bubbles, wall variation or hair transparency.
L05
Protect minimal skin life
Mix back a low-gain pre-look branch for face and hand, adjusting luminance first and hue only slightly.
Why: Small residual warmth preserves anatomy inside cyan.
Watch: Neutral skin will look composited above the water field.
L09
Manage cyan gamut and noise
Use gamut compression and a gentle low-luminance saturation taper, then inspect gradients after output transform.
Why: Cyan should remain smooth and dense without channel clipping or crawling shadow colour.
Watch: Broad desaturation will turn the pool grey and remove the face/water relationship.
Failure modes to check before approval
Neutralized skin appearing pasted into the cyan water.
Red-channel noise exposed by face recovery.
Banding or posterization in the pool wall.
Denoise smearing bubbles, wet hair and water distortion.